Token launches, rebuilt for Ethereum L1
Ethereum doesn’t need another launchpad, it needs its own. With the Factory, users and agents can launch a token in seconds, natively on Mainnet
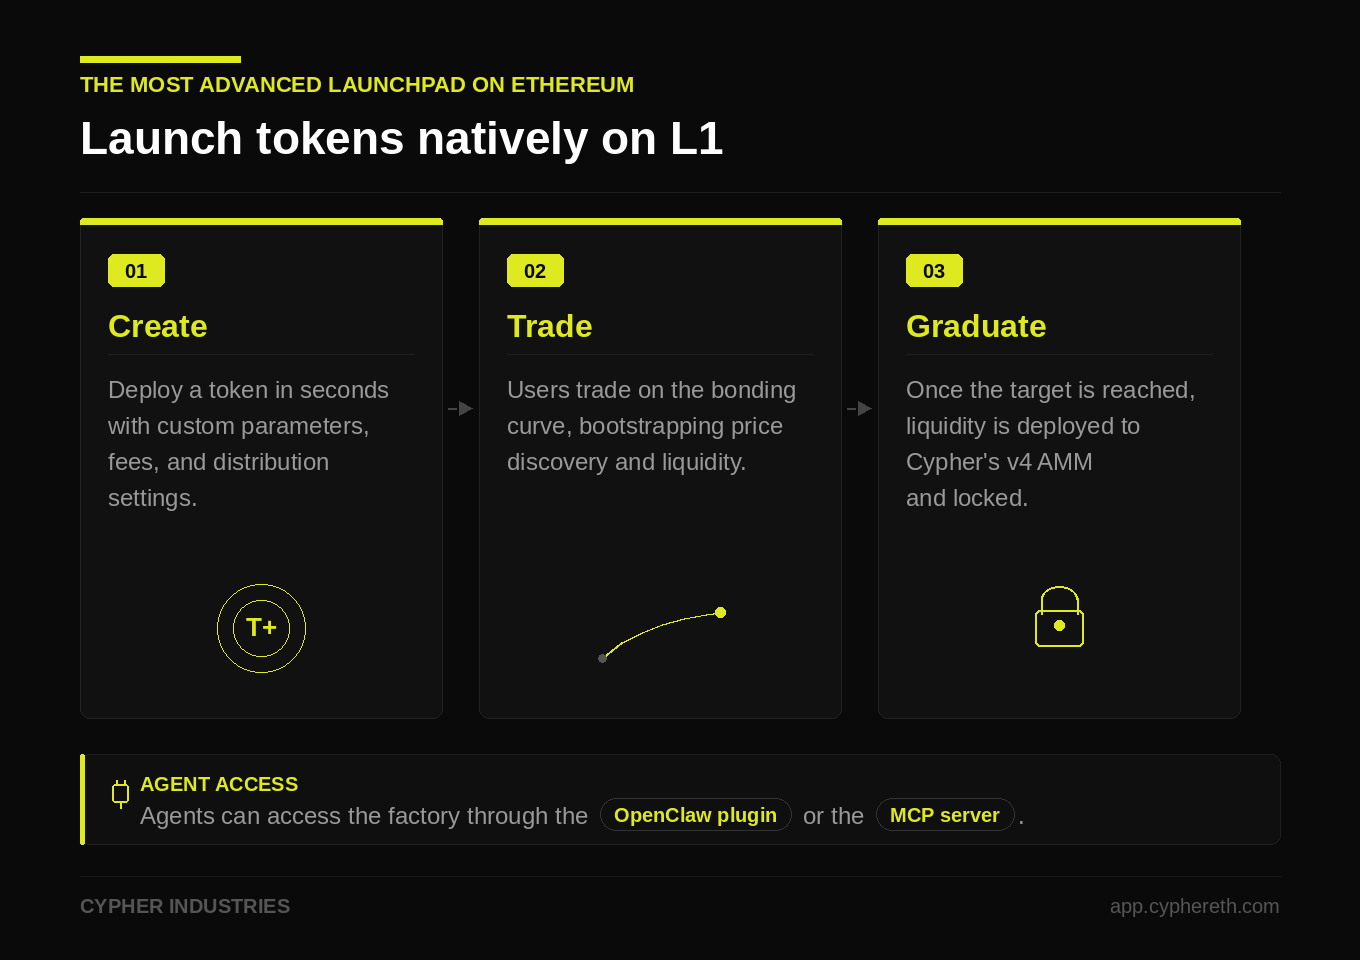
Tokens can be created with multiple fee options and features, with liquidity seeded on Cypher’s novel v4 AMM after graduation
- The bonding curve for new tokens starts at a $1.3k market cap. A total of 2.5 ETH is required to fully bond at a graduation valuation of $33k
- Once graduated, token liquidity is seeded and locked on Cypher’s v4 AMM with dynamic, volatility-adjusted fees
- Users can choose for token fees to be distributed to the creator, a custom wallet, or split into a community staking vault. 75% of fees go to the creator, with 25% allocated to the xCYPH community
- Creators can set an amount to pre-buy from the bonding curve, ensuring fair allocation and preventing post-launch sniping
- Users can create referral links to earn from trading volume on new tokens
- Agents can access the factory through the OpenClaw plugin or the MCP server
- After graduation, users can provide liquidity to the v4 pool to earn 85% of the fees, with 15% going towards the xCYPH community
- The Factory launches with a simple foundation, with additional features to be continuously rolled out
Cypher Factory Quickstart Guide
A plain-language guide to getting started with the Cypher Factory AI tools. No coding experience required
What is Cypher Factory?
Cypher Factory is a token launchpad on Ethereum Mainnet. It lets anyone create and trade tokens using a bonding curve — a smart contract that automatically sets the token price based on supply and demand. As more people buy, the price goes up. As people sell, it goes down. No exchange listing needed
When a token accumulates enough trading activity, it graduates — moving from the bonding curve to a real decentralized exchange (DEX) with a liquidity pool
What are the AI tools?
This project gives AI assistants (like Claude, Cursor, or OpenClaw agents) the ability to interact with Cypher Factory on your behalf. Instead of clicking through a website, you tell your AI assistant what you want in plain English:
"Check the price of MOON token and buy 0.1 ETH worth if it's under $0.01"
The AI figures out which operations to run, checks safety limits, and executes the trade
There are two ways to connect your AI assistant to Cypher Factory:
| Tool | Best for | Works with |
|---|---|---|
| MCP Server | People who use Claude, Cursor, ChatGPT, or any MCP-compatible app | 100+ apps support MCP |
| OpenClaw Plugin | People who use OpenClaw AI agents | OpenClaw gateway |
Both give your AI the same 57 tools. Pick whichever matches the AI app you already use
Part 1: MCP Server Setup
Who is this for?
You use any app that supports MCP (Model Context Protocol). MCP is an open standard adopted across the AI industry. Here are the most popular apps that work with the Cypher Factory MCP server:
AI Assistants and Chat
- Claude Desktop App, Claude.ai, Claude Code (Anthropic)
- ChatGPT (OpenAI)
- Gemini CLI (Google)
- Amazon Q CLI / Amazon Q IDE (AWS)
- Codex CLI (OpenAI)
- Cherry Studio, LM Studio, BoltAI, Chatbox
Code Editors and IDEs
- Cursor
- Windsurf (Codeium)
- VS Code with GitHub Copilot
- JetBrains IDEs (IntelliJ, WebStorm, PyCharm — 2025.2+)
- Zed
- Cline, Continue, Roo Code, Kilo Code (VS Code extensions)
Terminals
- Warp
- goose (by Block)
- Amazon Q CLI
Agent Frameworks (for developers)
- Vercel AI SDK, Genkit (Firebase), Spring AI, LangFlow
For the full list of 100+ MCP-compatible clients, see modelcontextprotocol.io/clients
Step 1: Make sure you have Node.js 24+
Open a terminal and type:
node --version
You should see v24.x.x or higher. If not, install Node.js from nodejs.org (choose the "Current" version, not LTS)
Step 2: Add the server to your AI app
The setup is the same across all MCP clients — you add a server entry that tells the app how to launch the Cypher Factory server. The JSON config is identical; only where you paste it differs
The config to add:
{
  "cypher-factory": {
    "command": "npx",
    "args": ["@cypherindustries/factory-mcp-server"],
    "env": {
      "CYPHER_KEYSTORE_PASSWORD": "pick-a-strong-password"
    }
  }
}
Where to put it:
| App | Where to add the config |
|---|---|
| Claude Code | ~/.claude/mcp.json (wrap in {"mcpServers": { ... }}) |
| Claude Desktop | Settings > Developer > Edit Config (wrap in {"mcpServers": { ... }}) |
| Cursor | Settings > MCP Servers |
| Windsurf | Settings > MCP |
| VS Code (Copilot) | .vscode/mcp.json in your workspace, or User Settings > MCP |
| JetBrains | Settings > Tools > AI Assistant > MCP Servers |
| Cline | Cline sidebar > MCP Servers > Add |
| ChatGPT | Settings > Connections > Add MCP server |
| Zed | ~/.config/zed/settings.json under "context_servers" |
| Warp | Settings > AI > MCP |
For other apps, check their docs for "MCP server" or "MCP configuration". The JSON payload above is the same everywhere
That's it for the basic setup. The server starts in read-only mode the first time — you can browse tokens, check prices, and explore the protocol immediately
Step 3: Enable trading (optional)
To actually buy/sell tokens, you need a wallet with ETH. You have two options:
Option A: Auto-generated wallet (recommended for new users)
- The first time the server starts with
CYPHER_KEYSTORE_PASSWORDset, it automatically creates a wallet and prints the address to the console - Send ETH to that address
- Restart Claude Code (or your editor). The server will detect the funded wallet and enable write operations
Option B: Use your own wallet Just tell the AI you have an existing wallet and give it your private key. The AI will add it to the server config and set a keystore password. On the next restart, the SDK encrypts your key into an AES-256 keystore file — after that, the plaintext key is no longer needed. You'll need to restart Claude Code (or your editor) for the keystore to be generated
Step 4: Start using it
Open Claude Code and just ask things naturally:
- "What tokens are available on Cypher Factory?"
- "Show me the price and stats for token 0xABC..."
- "Buy 0.05 ETH worth of MOON token"
- "Deploy a new token called StarCat with symbol SCAT"
- "Check my portfolio"
The AI handles the rest.
Part 2: OpenClaw Plugin Setup
Who is this for?
You use OpenClaw to run AI agents
Step 1: Install the plugin
openclaw plugins install @cypherindustries/factory-openclaw-plugin
That's it. The plugin works immediately in read-only mode — your agent can browse tokens, check prices, and explore the protocol with no further configuration
Step 2: Enable trading (optional)
To let the agent buy, sell, and deploy tokens, you have two options:
Option A: Auto-generated wallet (recommended for new users)
export CYPHER_KEYSTORE_PASSWORD="pick-a-strong-password"
On first run, the plugin auto-generates a wallet and saves it encrypted. Fund the printed address with ETH to enable trading
Option B: Use your own wallet Tell the agent you have an existing wallet and give it your private key. The agent will configure it and set a keystore password. On the next restart, the SDK encrypts your key into an AES-256 keystore file — after that, the plaintext key is no longer needed. You'll need to restart the agent for the keystore to be generated
No config files to edit. All defaults (Ethereum Mainnet network, contract addresses, spending limits) work out of the box
Step 3: Start using it
Talk to your OpenClaw agent naturally. All tool names are prefixed with cypher_ so there's no confusion with other plugins:
- "Check the price of token 0xABC..."
- "Buy 0.1 ETH of MOON"
- "Start the launch sniper strategy"
- "Set my max trade to 0.2 ETH" (adjusts spending limits at runtime — no config file needed)
You can customize almost everything just by asking your agent in plain English — no config files needed:
- "Set my daily budget to 10 ETH"
- "Change slippage to 500 bps"
- "Set stop loss to 20%"
- "Update gas reserve to 0.1 ETH"
- "Set cooldown between trades to 10 seconds"
- "Blacklist token 0xABC..."
These use the cypher_update_config and cypher_update_tx_gate tools behind the scenes. Changes take effect immediately
What can the AI do?
Here's a plain-English summary of all the capabilities, grouped by category:
Check things (free, no gas needed)
- Token info — price, supply, market cap, whether it has graduated
- Price quotes — "how many tokens would I get for 0.5 ETH?" (and the reverse)
- Balances — your ETH balance, token balances, staking positions
- Portfolio — a summary of everything you own across tokens, staking, vesting, and referrals
- Transaction history — recent buys, sells, deploys
- Protocol status — whether the protocol is paused, what the creation fee is
Trade tokens (costs gas)
- Buy — buy tokens on the bonding curve with ETH
- Sell — sell tokens back for ETH
- Deploy — create a brand new token with a name, symbol, description, image, and social links
- Graduate — push a token past its max supply to move it to a DEX (you earn a caller fee for doing this)
- Transfer — send tokens directly to another wallet (only works after graduation)
Staking and earning
- Stake — deposit tokens into a staking vault to earn yield
- Unstake — request withdrawal (there's a cooldown period), then claim after
- Referrals — generate referral links and claim earned referral rewards
- Vesting — create or check token vesting schedules
Automated strategies (advanced)
- Launch Sniper — automatically buys newly deployed tokens
- Momentum — buys tokens showing consecutive buy activity
- Graduation Sniper — watches tokens near graduation and triggers it to earn the caller fee
- Exit Monitor — watches your positions and auto-sells on stop-loss or take-profit
Strategies require a WebSocket RPC connection (wss:// URL). Ask the AI to switch to a wss:// endpoint from your RPC provider
Safety features
The AI tools include multiple safety layers so your funds are protected even if the AI makes a mistake:
Spending limits (Transaction Gate)
- Maximum ETH per transaction (default: 1 ETH)
- Rolling 24-hour budget (default: 5 ETH)
- Cooldown between transactions (default: 5 seconds)
- Token blacklist — block trades on specific tokens
These defaults are conservative. You can adjust them by asking the AI ("set my max trade to 0.2 ETH") or through config.
Other protections
- Read-only mode — if no wallet is configured, the AI can only read data, never spend
- Pre-flight simulation — before sending a transaction, the system simulates it to catch errors early
- Input validation — all parameters are checked before anything executes
- Prompt injection detection — freeform text fields (like token names) are scanned for manipulation attempts
- Encrypted wallet — when using the keystore approach, your private key is stored encrypted on disk (AES-256), never in plain text
Glossary
| Term | Meaning |
|---|---|
| Bonding curve | A smart contract that sets token prices mathematically based on supply. More buys = higher price |
| Graduation | When a token has enough demand, it moves from the bonding curve to a real DEX with a liquidity pool |
| Gas | A small fee (in ETH) paid to the network to process transactions. Reading data is free; writing (buying, selling, deploying) costs gas |
| MCP | Model Context Protocol — an open standard (under the Linux Foundation) that lets AI apps connect to external tools and data sources. Supported by 100+ apps including Claude, ChatGPT, Cursor, and VS Code |
| OpenClaw | An AI agent platform that supports plugins for extending agent capabilities |
| Ethereum Mainnet | The primary Ethereum network where tokens have real monetary value |
| RPC | The network endpoint your tools connect through to talk to the blockchain. Think of it as the "internet connection" to Ethereum |
| TxGate | The built-in spending limit system. It checks every transaction against your configured limits before allowing it through |
| Staking vault | A smart contract where you deposit tokens to earn yield over time |
| Vesting | A schedule that releases tokens gradually over time instead of all at once |
Troubleshooting
"Write operations will throw errors" Your wallet isn't configured or funded. Set up a wallet (see Step 3 for MCP Server or Step 2 for OpenClaw Plugin) and fund it with ETH
"Strategy requires wss:// RPC"
Automated strategies need a WebSocket connection. Ask the AI to switch to a wss:// endpoint ("change the RPC to wss://...")
"Tx blocked: BUDGET_EXCEEDED" You've hit your 24-hour spending limit. Wait for the rolling window to reset, or ask the AI to increase the budget ("set daily budget to 10 ETH")
"Tx blocked: PER_TX_EXCEEDED" The trade amount exceeds your per-transaction limit. Either reduce the amount or ask the AI to increase the limit ("set max per transaction to 2 ETH")
Transactions are slow The default RPC is a shared public endpoint. For faster, more reliable connections, get a free API key from Alchemy and ask the AI to switch to your own endpoint ("change the RPC to wss://eth-mainnet.g.alchemy.com/v2/YOUR_KEY")